Scale Lab
Scale Lab: C Major in Open Position
In Chapter 14, you learned about the Major Scale as one long line up a single string. That made the 221-2221 pattern easy to visualize but it's a little hard to play. Now we will fold the C Major scale across a set of strings so that your hand can stay in a single playing position.
Two Ways Guitar Teachers Show a Scale
Guitar teachers commonly use two kinds of pictures to teach a scale: a scale diagram and guitar tablature, usually shortened to tab. You will learn to read both in this lab.
At first, the two can look similar because both use six horizontal lines for the guitar strings. They also point you to the same locations on the same instrument. The important difference is what happens as your eyes move from left to right:
- On a scale diagram, left to right represents physical space on the fretboard. Moving right means moving toward higher frets. The diagram is a map that lets you see the whole hand position at once.
- In tab, left to right represents time. Moving right means playing the next note. Tab turns the same fretboard locations into a sequence you can perform.
A scale diagram is especially useful for answering, “Where does my hand go?” Tab is especially useful for answering, “What do I play next, and when?” They are two views of the same fingering pattern, and learning to move between them is an important guitar-reading skill.
Method 1: Read the Scale Diagram
A scale diagram is a map of the guitar neck. The horizontal lines are the strings, with the high e string at the top and the low E string at the bottom. The vertical lines divide the frets, and the thick vertical line at the left is the nut. A circle to the left of the nut means to play an open string; a circle inside a fret space shows where to press the string.
In this diagram, the numbers inside the circles are fretting-hand fingers: 1 is your index finger, 2 is your middle finger, and 3 is your ring finger. A 0 means to play the open string with no fretting finger. The red circles mark the starting and ending points. Other scale diagrams may use different kinds of labels, so always check what the numbers or symbols mean.
Open-position fingering rule: fret number = finger number.
- 1st fret = 1st finger (index)
- 2nd fret = 2nd finger (middle)
- 3rd fret = 3rd finger (ring)
- 4th fret = 4th finger (little finger)
- Open string = 0, with no fretting finger
For these open-position exercises, this is a requirement. Do not substitute a different fingering, even if another finger feels easier at first. Keeping one finger assigned to each fret builds a reliable hand position.
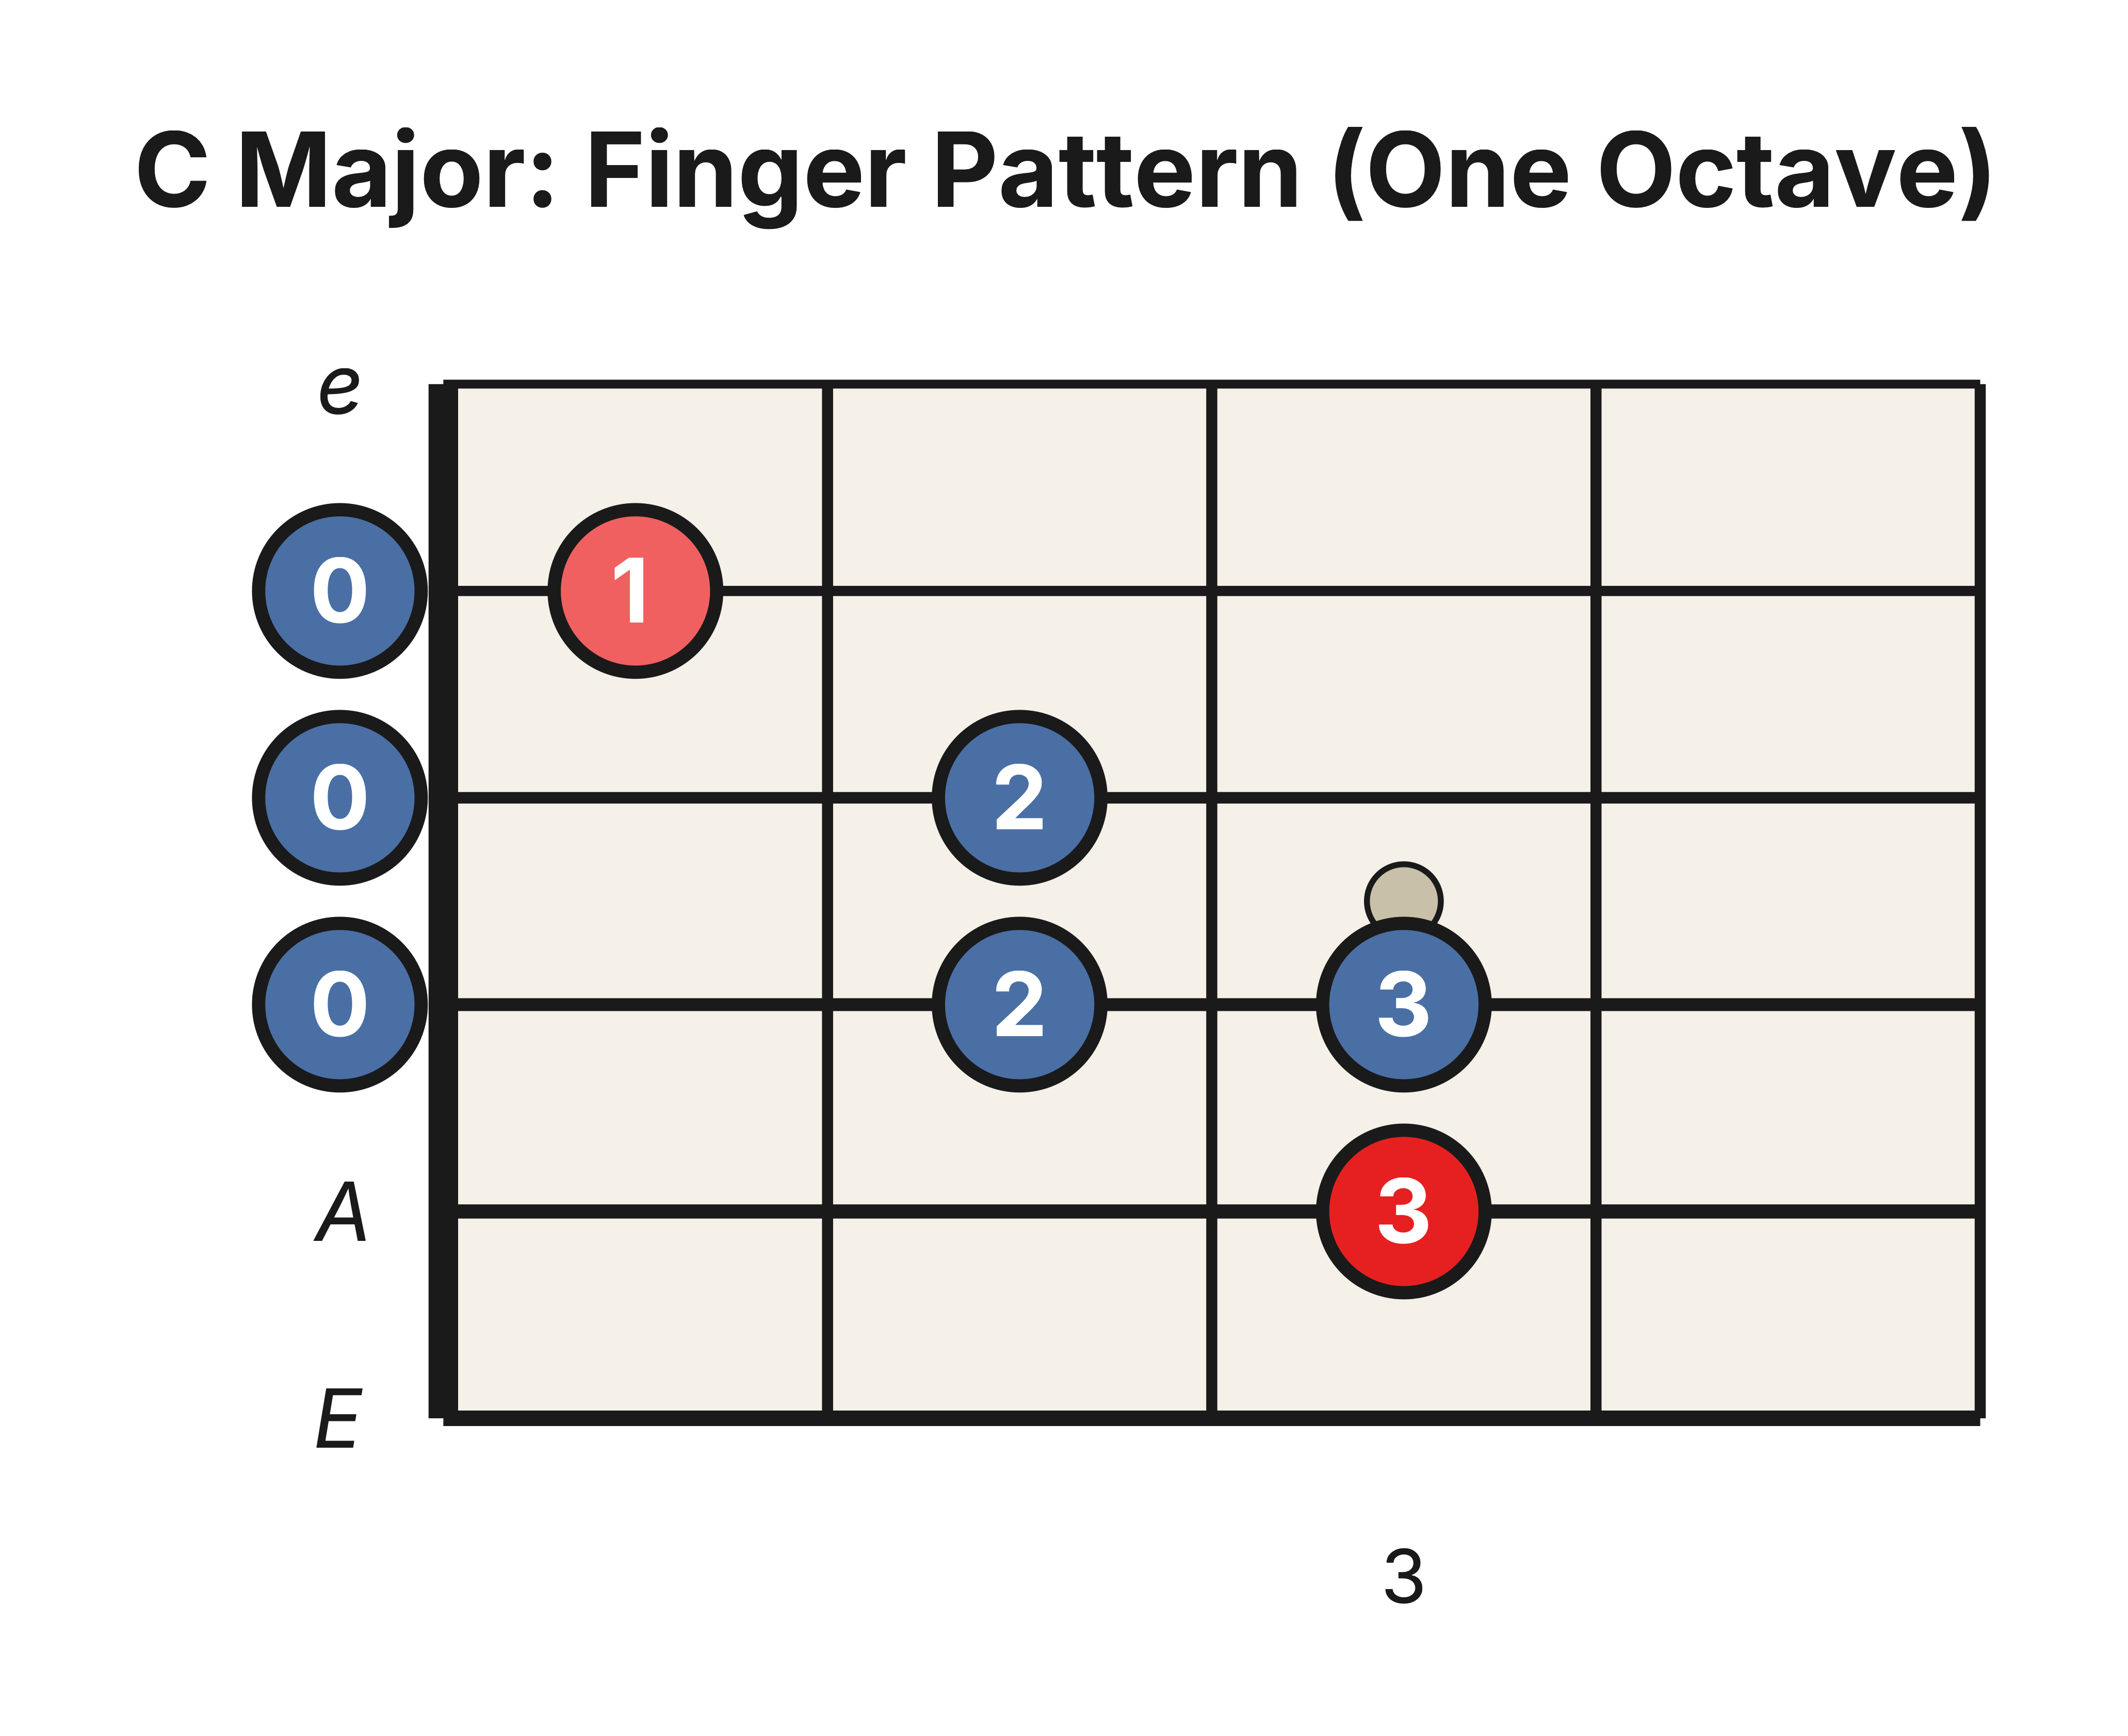
The diagram shows every location in the pattern at once, but it does not place the notes on a timeline. To play the scale in ascending order, start with your 3rd finger on the A string’s 3rd fret. Then play:
- D string: open, 2nd fret, 3rd fret
- G string: open, 2nd fret
- B string: open, 1st fret
Method 2: Read the Scale in Tablature
Tablature uses six horizontal string lines too, with the high e string on top and the low E string on the bottom. Unlike the scale diagram, tab is read from left to right as a playing sequence. A number written on a string line tells you which fret to play on that string. A 0 means to play the string open. The vertical bar lines divide the music into measures, and the stems beneath the numbers show that these notes are quarter notes.
Compare the first note in both views. The scale diagram places a circle in the A string’s 3rd-fret space and puts a 3 inside it to tell you to use your 3rd finger. The tab places a 3 on the A-string line to tell you to play the 3rd fret. Both describe the same action from a different point of view.
Because this lab uses the strict open-position rule fret number = finger number, the numbers match: tab fret 1 uses finger 1, fret 2 uses finger 2, and fret 3 uses finger 3. Keep their meanings clear, though: the number in this scale diagram tells you the finger, while a number in tab always tells you the fret.
Exercise 1: Ascending
Begin with your 3rd finger on the A string’s 3rd fret. Follow the tablature from left to right as the scale climbs to the B string’s 1st fret.
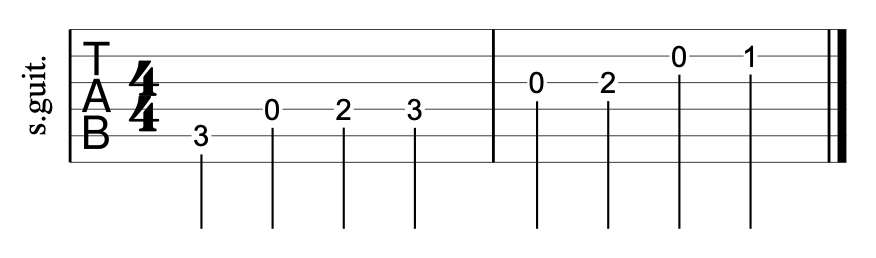
Count 1, 2, 3, 4 | 1, 2, 3, 4. Keep the pulse even and listen to the sound rise toward the highest C.
Exercise 2: Descending
Now begin with your 1st finger on the B string’s 1st fret. Follow the reverse route until you return to the A string’s 3rd fret.
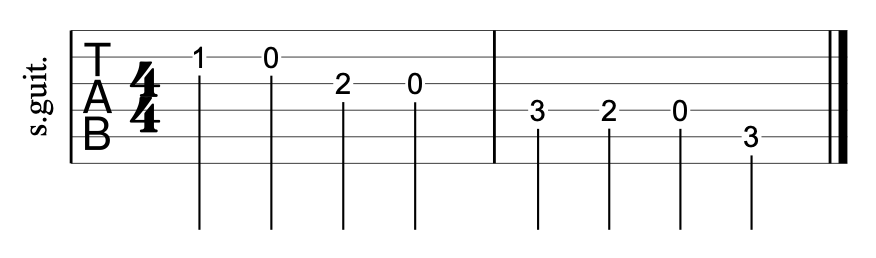
Count the same two measures: 1, 2, 3, 4 | 1, 2, 3, 4. Listen to the sound fall toward the final C, and let that last note ring.
Exercise 3: Ascending and Descending
Once each direction feels comfortable by itself, connect them. Here is the full exercise: two measures ascending followed by two measures descending.

The note stems show quarter notes, so play one note on each beat. You'll play the "lighter shade" C twice - once to finish the ascending half and again to begin the descending half.
Start slowly and aim for an even pulse rather than speed. Listen as the sound rises toward the highest C and then falls back to the starting C. Let the final note ring before you repeat the exercise.
Four short ways to practice
- Ascending: Repeat Exercise 1 four times. Keep fret number = finger number and maintain an even pulse.
- Descending: Repeat Exercise 2 four times. Begin with finger 1 already in position on the B string’s 1st fret.
- Put them together: Play Exercise 3 without pausing at the turnaround. Count all four measures aloud.
- Listen and remember: Cover the diagrams and play the full exercise from memory. On another repetition, hum or sing along without worrying about note names. Let the final C ring and notice how settled it sounds.
Your Level 1 note-memorization goal has not changed. In the next chapter, you will begin memorizing fretted note locations on the E, A, and D strings. In this lab, you are allowed to play across the G and B strings without naming every note there. That separation is intentional: your fingers learn a fixed open-position route while your ears learn the sound of the C Major scale. The note-name work continues next.